728x90
JDBC를 사용해서 애플리케이션 개발해보기
회원 데이터를 데이터베이스에 관리하는 기능을 개발
Member
@Data
public class Member {

    private String memberId;
    private int money;
    public Member() {
    }

   public Member(String memberId, int money) {
        this.memberId = memberId;
        this.money = money;
    }
}JDBC를 사용해서 이렇게 만든 회원 객체를 데이터베이스에 저장해보자.
등록
MemberRepositoryV0 - 회원 등록
@Slf4j
public class MemberRepositoryV0 {

    public Member save(Member member) throws SQLException {
        String sql = "insert into member(member_id, money) values (?, ?)";

        Connection con = null;
        PreparedStatement pstmt = null;


        try {
            con = getConnection();
            pstmt = con.prepareStatement(sql);
            pstmt.setString(1, member.getMemberId());
            pstmt.setInt(2, member.getMoney());
            pstmt.executeUpdate();
            return member;
        } catch (SQLException e) {
            log.error("db error", e);
            throw e;
        } finally {
            close(con, pstmt, null);

        }

    }

    private void close(Connection con, Statement stmt, ResultSet rs) {

        if (rs != null) {
            try {
                rs.close();
            } catch (SQLException e) {
                log.info("error", e);
            }
        }

        if (stmt != null) {
            try {
                stmt.close();
            } catch (SQLException e) {
                log.info("error", e);
            }
        }

        if (con != null) {
            try {
                con.close();
            } catch (SQLException e) {
                log.info("error", e);
            }

        }

    }

    private static Connection getConnection() {
        return DBConnectionUtil.getConnection();
    }
}
커넥션 획득
getConnection() : DBConnectionUtil 를 통해서 데이터베이스 커넥션을 획득한다.
//DBConnectionUtil
Connection connection = DriverManager.getConnection(URL, USERNAME, PASSWORD);
save() - SQL 전달
- sql : 데이터베이스에 전달할 SQL을 정의한다. 여기서는 데이터를 등록해야 하므로 insert sql 을 준비 했다.
- con.prepareStatement(sql) : 데이터베이스에 전달할 SQL과 파라미터로 전달할 데이터들을 준비한다.
- pstmt.setString(1, member.getMemberId()) : SQL의 첫번째 ? 에 값을 지정한다. 문자이므로 setString 을 사용한다.
- pstmt.executeUpdate() : Statement 를 통해 준비된 SQL을 커넥션을 통해 실제 데이터베이스에 전달한다. 참고로 executeUpdate() 은 int 를 반환하는데 영향받은 DB row 수를 반환한다. 여기서는 하나의 row를 등록했으므로 1을 반환한다.
리소스 정리
쿼리를 실행하고 나면 리소스를 정리해야 한다. 여기서는 Connection , PreparedStatement 를 사용했다.
리소스를 정리할 때는 항상 역순으로 해야한다.
Connection 을 먼저 획득하고 Connection 을 통해 PreparedStatement 를 만들었기 때문에 리소스를 반환할 때는 PreparedStatement 를 먼저 종료하고, 그 다음에 Connection 을 종료하면 된다.
주의할 점
리소스 정리는 꼭! 해주어야 한다. 따라서 예외가 발생하든, 하지 않든 항상 수행되어야 하므로 finally 구 문에 주의해서 작성해야한다. 만약 이 부분을 놓치게 되면 커넥션이 끊어지지 않고 계속 유지되는 문제가 발 생할 수 있다. 이런 것을 리소스 누수라고 하는데, 결과적으로 커넥션 부족으로 장애가 발생할 수 있다.
조회
public Member findById(String memberId) throws SQLException {
    String sql = "select * from member where member_id = ?";

    Connection con = null;
    PreparedStatement pstmt = null;
    ResultSet rs = null;

    try {
        con = getConnection();
        pstmt = con.prepareStatement(sql);
        pstmt.setString(1, memberId);

        rs = pstmt.executeQuery(); // select 결과를 담고 있음
        if (rs.next()){
            Member member = new Member();
            member.setMemberId(rs.getString("member_id"));
            member.setMoney(rs.getInt("money"));
            return member;
        } else {
            throw new NoSuchElementException("member not found memberId=" + memberId);
        }

    } catch (SQLException e) {
        log.error("db error", e);
        throw e;
    } finally {
        close(con, pstmt, rs);
    }

}
findById() - 쿼리 실행
- sql : 데이터 조회를 위한 select SQL을 준비한다.
- rs = pstmt.executeQuery() : 데이터를 변경할 때는 executeUpdate() 를 사용하지만, 데이터를 조회 할 때는 executeQuery() 를 사용한다. executeQuery() 는 결과를 ResultSet 에 담아서 반환한다
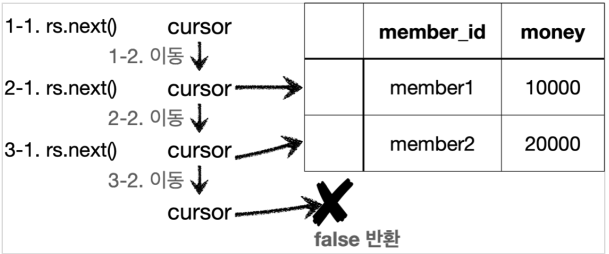
ResultSet

- ResultSet 은 다음과 같이 생긴 데이터 구조이다. 보통 select 쿼리의 결과가 순서대로 들어간다.
- 예를 들어서 select member_id, money 라고 지정하면 member_id , money 라는 이름으로 데이터 가 저장된다.
- ResultSet 내부에 있는 커서( cursor )를 이동해서 다음 데이터를 조회할 수 있다.
- rs.next() : 이것을 호출하면 커서가 다음으로 이동한다. 참고로 최초의 커서는 데이터를 가리키고 있지 않기 때문에 rs.next() 를 최초 한번은 호출해야 데이터를 조회할 수 있다
- rs.next() 의 결과가 true 면 커서의 이동 결과 데이터가 있다는 뜻이다.
- rs.next() 의 결과가 false 면 더이상 커서가 가리키는 데이터가 없다는 뜻이다
- rs.getString("member_id") : 현재 커서가 가리키고 있는 위치의 member_id 데이터를 String 타입으로 반환한다.
findById에서는 회원 한명을 조회하는 것이므로 while문 대신 if문을 사용해서 id가 일치하는 회원이 있는지 확인하는 로직이다.
수정
public void update(String memberId, int money) throws SQLException {
    String sql = "update member set money=? where member_id=?";

    Connection con = null;
    PreparedStatement pstmt = null;

    try {
        con = getConnection();
        pstmt = con.prepareStatement(sql);
        pstmt.setInt(1, money);
        pstmt.setString(2, memberId);
        int resultSize = pstmt.executeUpdate(); //executeUpdate() 는 쿼리를 실행하고 영향받은 row수를 반환한다
        log.info("resultSize={}", resultSize);
    } catch (SQLException e) {
        log.error("db error", e);
        throw e;
    } finally {
        close(con, pstmt, null);

    }
}
삭제
public void delete(String memberId) throws SQLException {
    String sql = "delete from member where member_id=?";

    Connection con = null;
    PreparedStatement pstmt = null;

    try {
        con = getConnection();
        pstmt = con.prepareStatement(sql);
        pstmt.setString(1, memberId);
        pstmt.executeUpdate(); //executeUpdate() 는 쿼리를 실행하고 영향받은 row수를 반환한다
    } catch (SQLException e) {
        log.error("db error", e);
        throw e;
    } finally {
        close(con, pstmt, null);

    }
}
테스트를 2번 연속 실행하면 pk 중복 오류가 발생하므로 delete쿼리를 사용해서 데이터를 삭제하는 로직을 만들었다.
728x90
'Spring > Spring DB' 카테고리의 다른 글
| JDBC에 의존하는 트랜잭션을 적용하면서 나타나는 문제점 (0) | 2023.10.03 |
|---|---|
| 트랜잭션 (1) | 2023.10.02 |
| 커넥션 풀과 데이터소스 이해 (0) | 2023.09.29 |
| H2 데이터베이스 연결 (0) | 2023.09.24 |
| JDBC의 이해 (0) | 2023.09.24 |

